Saturday, December 5, 2020

A Lone, Wandering Samurai...


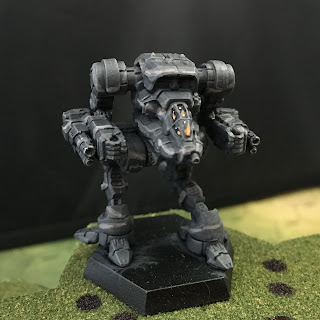
This piece was borne out of an accidental paint discharge while I was trying to clear the nozzle of a bottle of VJ Jade Green. Rather than let a lot of paint go to waste, I grabbed a spare BattleTech Hatamoto-Chi Assault 'Mech and went to town. 

I tried to get a verdigris effect on the bronze armor sections with some watered down turquoise paint. That's the number 7 in kanji on the chest.

I gave it my best shot to freehand the kanji character for 'fire' and (barely visible) 'blade.'

The characters for 'free' and I forget if that's 'wind' or 'sky.'

VJ Jade Green with an edge highlight of VJ Foul Green.

For the base, I wanted to evoke the image of BattleMech combat in a city park or similar. The head is from a Project Phoenix Thunderbolt 9M from Iron Wind Metals, and I tried to paint it with molten edges at the neck and a cracked canopy as if it was freshly blasted from it's shoulders.  


 As far as who this is meant to represent, I left it ambiguous. I really like it when minis can fulfill multiple roles, and this scheme doesn't match anything canon in BattleTech. So this mini can serve as a notable commander or noble, an ace MechWarrior, a Solaris gladiator, a wandering ronin MehWarrior, a corporate mercenary, a pirate, or part of a merc group that doesn't have a unified scheme. This 'Mech is a House Kurita design, who rule the Draconis Combine and are well-known for their favor of Japanese culture and stylings, which make it all the way down to BattleMech design! The Hatamoto is known as a tough 80-tonner, with plenty of armor and the ability to hit from longer ranges with x2 PPCs or up close with twin SRM-6 racks, and were quite a rude shock to the invading FedCom when they debuted during the War of 3039.

Updated Mistweavers

 
I have just about finished my Clan Smoke Jaguar Beta Galaxy Command Star. I need to seal these and then apply some decals, but otherwise are set to go! 


Monday, November 9, 2020

No Guts, No Galaxy!

 My nearest and dearest fictional universe has been BattleTech for many years now. You wouldn't be able to tell by this blog, but I've been invested in the Inner Sphere, the Clans, the Star League since the cartoon got me in 1994. No matter what other game line or alternate interest sinks it's hooks in, I always come back to the one I love. 

 Today, I'd like to present a few pieces from the various Clan factions. Descendants of the fallen Star League's vast army, a ruinous civil war forced a change upon this society into what the Inner Sphere would later dread as the Clans.

First off, a Dire Wolf test piece for Clan Jade Falcon's Turkina Keshik, an elite unit that serves as both a bodyguard formation to the Clan's Khan and as a tactical strike force. This unit took part in far more planetary invasions in the initial Clan Invasion, called Operation REVIVAL, than I realized previously, including a fight against the Grey Death Legion, my favorite mercenary group. One of the least fun aspects of this paint scheme is that it calls for falcon murals to be prominent on all machines, which is not something that's really in my wheelhouse. My vision isn't always the greatest, but I think I managed. I have a spare Star of plastic OmniMechs from the recent Kickstarter that I am trying to talk myself out of painting in Turkina Keshik colors.


This was the example to go by, from an Alpha Strike stat card. I kinda wish I'd gone with a lighter turquoise color on my Dire Wolf

Next, a Clan that is truly near and dear, the Smoke Jaguars! Easily the most brutal of the Invading Clans, the Jaguars never did much for me until I read of their destruction in 3060 at the hands of a multinational Inner Sphere offensive. For some reason, I've been all-in on them since then. These are works-in-progress from the Smoke Jaguar Beta Galaxy, and are all new plastic miniatures from the Kickstarter, specifically the Clan Command Star.


The white spots on either sides of the cockpit are going to be yellow felinid eyes, in keeping with the official scheme.


These are packed with details and are a joy to paint! Beta Galaxy uses shades of grey to represent a 'banks of mist' effect, so I tried to soften the appearance of some of the lighter grey stripes in some areas while leaving them more distinct in other spots. Beta is not the most successful Galaxy, having captured and then lost Hohiro Kurita before they knew they had him, losing control of the city of Edo on Turtle Bay that resulted in that city being wiped off the map by orbital bombardment, walking into the trap on Wolcott, and becoming mired in the Racice Delta on Tukayyid and failing to capture their objective. They also took part in the failed invasion of the Draconis Combine's capital of Luthien alongside Clan Nova Cat. But I like the scheme, and some of the earliest works to talk about the Jags (like the Luthien scenario book) mention the Jaguar Guards Clusters (of which there were two, both in Beta) in ways that suggest they were the early big-bads of the Clan, before the likes of the Jaguar Grenadiers or those pansies in the 6th Jaguar Dragoons were fleshed out. 


Much more to come!

How I Base My Miniatures

 Hello again! Today I'm trying my hand at a tutorial-style post showing my technique for basing miniatures. You'll note BattleTech will be dominant in this thanks to needing to fill some gaps in their hex bases (and because I freakin' love BattleTech!), but any miniatures that require some base gap filling or even not should be well-served by this technique.

Here is what you'll need. Your miniature, some PVA glue, some super thin cyanocrylate (CA) glue, some railroad ballast, and something to spread the PVA glue around (I use an old paperclip)

For starters, these are all we'll need

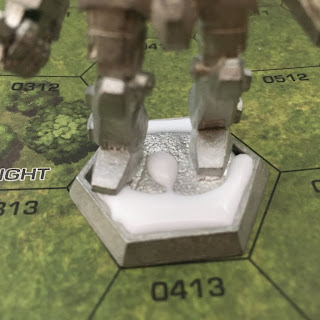
So, after you've attached your mini to it's base, you'll be looking to use the PVA glue to fill in those gaps as well as to give the railway ballast something to hold onto. I apply most of the glue to the gaps, but also apply a dot on the sculpted-on base between the miniature's legs. 

Off to a good start! I used some extra glue by the mini's right foot to account for the overhang from the foot

Once you're satisfied with the amount of glue, we'll take our spreading tool to push and pull the glue into all the gaps and provide an even covering all over the base. I would recommend less being more initially, as having too much PVA glue will sabotage you later in the process.

All smoothed and spread out

Now, I just do a sweep of the base through my cup of ballast. You want to make sure the entirety of the base is submerged in the ballast. No need to let it sit for any extended period, the ballast will grab onto the PVA very easily. 


You should be looking about like this

Now, the next part is fairly important. I use a putty sculpting tool to "push down" the ballast that will have crept up the feet of the miniature. There is enough capillary action with the PVA for it to slightly ascend up the surface of the miniature's feet where the foot is sculpted onto the mini-base. Leaving it as is results in a fairly unnatural appearance, though I suppose it could be good for a muddy/swampy terrain theme.


With the offending PVA/ballast pushed down.

The last step will call for the extra thin CA glue. As soon as you are satisfied with how the ballast looks (be certain, as your choice will soon be very difficult to correct), take the CA glue and just apply maybe 2-3 quick drops. I don't rightly know what the ballast is made from, but it sucks up liquids like a sponge. The CA with very quickly spread throughout the ballast and rapidly harden into a protective shell. I find great value in this as PVA glue likes to contract as it dries, leaving you with odd gaps and "pits" in your mini base you'd swear weren't there a couple hours ago.

See how the glue looks compared to the above picture? Liar. 

As the above video hopefully shows, the glue and ballast dries literally within seconds into a fairly durable shell. Now, I'd be remiss if I didn't mention that very rarely I have issues with this technique with the ballast shell peeling back slightly at the corners, I've been able to glue them back down each time, but it's still something of a pain. Again this is rare, and my best guess is it has something to do with the amount of PVA glue underneath the ballast shell. Too much, and it gives too much wriggle-room for the ballast to shift as the CA glue dries. Be warned. 

This technique also works on flat bases, only difference is using less PVA and making sure to spread it out well


Works well on things other than giant walking tanks too!


These are a few examples of what these bases look like painted. Depending on how heavy handed you are with the CA glue, you can fill in many of the details between each individual fleck of ballast, or leave them fairly distinct. You'll quickly get the hang of what amount yields what result! 


Thanks for looking! I hope this is of some use to you.

Friday, October 30, 2020

Objective Tokens and Scatter Terrain

A brief post today, I made a few objective tokens using some of the containers from Footsore North America for modern games. I patterned these after the loot containers that you come across in the The Division 2, a video game I've been enjoying greatly these past few months after picking it up on the cheap. 

In-game, you come across containers like these that contain an item of equipment, like a holster or backpack or chest rig. The Division 2 is a "looter-shooter" where you're frequently picking up new equipment in the open world and from defeated enemies, equipment that has varying stats and abilities to fortify your character, or "agent."

Longer containers like this one contain new weapons, anything from assault rifles to shotguns to sidearms.

If you pay special attention to your surroundings, you may encounter these orange containers hanging in the trees or from building scaffolding that contain equipment and camo patterns for your gear and weapons. 


This one is different in that Mad Robot makes this resin backpack for their 28mm figures. I just glued one to a base to represent a dropped pack of supplies.

You might be wondering, why the orange rims on the bases? The Division 2 features an in-game augmented reality component thanks to an AI that's always with you called ISAC, who highlights objects of interest and certainly any nearby loot containers in an orange light to contrast with the drab surroundings in the game. 

Overall, I'm impressed with these offerings. The Footsore containers definitely had sides that were intended to be displayed face-up due to many casting marks and pitting during casting on the opposite sides. Mad Robot has been consistently high-quality, and I've ordered from them a number of times to help establish a few units for a 28mm GI Joe project I'm on-again, off-again working on. 

Lastly, I have a few pieces of scatter terrain from Plastcraft's urban elements pack. 


Trash skip. Very liberating to paint something like this, where you can play with paint chipping and trash staining.

 This is a double-sided standing display. I chose to paint it as broken-down TV display, maybe for cyberpunk or more rundown modern boards. I tried to replicate a static effect for the display screens by stippling grey and white over a black base. I'm proud of how it turned out! The stand I used some watered-down orange paint for a rust effect, and drybrushed a silver on the edges to make it look run down.

Until next time!

Monday, September 28, 2020

Metal Gear!?


I consider Metal Gear 2: Solid Snake to be one of my favorite games ever. I had to use a MSX emulator to get the original experience, but also played the updated version that came with one of the MGS3 special editions. I got into Metal Gear thanks to Metal Gear Solid around 1999 or so, buying a copy for my PS1 with a gift card for a birthday, picking that game as I remembered playing the original NES Metal Gear. It was a great shock to me how much of MGS as far as themes, plot points, and events were lifted from MG2. 


Cool story bro, I know. The point is, when IDW announced their Metal Gear Solid board game, I was all in. But delay has followed delay, and now my mind has wandered to alternate game systems for some Metal Gear action. This project was planned as a reskin of the board game, but I've also found Osprey Games' Black Ops by Guy Bowers. He lists MGS as an inspiration in the foreword, and it's clear he's a big fan. I'm still digesting the rules, but this seems like a great system to get my Solid Snake itch taken care of. https://ospreypublishing.com/black-ops


I've customized a few figures for this theme already. Made in 1990 but set in the far away year of 1999, it has a delightfully 80's feel to it, so I wanted to try to capture that when possible, and I wanted to try and be as true to the characters as possible- even if they're just 8-bit sprites. I did make a few altercations in the name of gameplay and (hopefully) spicing up specific encounters with certain enemies.


Solid Snake here is originally a RAFM figure from their Modern Heroes line, I think he's called the SWAT lieutenant or something to that effect. Main conversion work was cutting away the M4 carbine he was holding and replacing it with a silenced MAC-10 from Hasslefree, a MAC-11 being what Snake eventually finds in Zanzibar Land. Otherwise, just a small bit of trimming to make a channel in the sculpt's hair to make room for the trademark bandana with GS, a small GS pouch on the right breast to cover some of my hacking to remove the M4, and a GS silencer for the holstered pistol (which we'll assume is a Beretta 92F). Colors mainly blocked on at this point with some drybrushing, still need to do some washing and highlights.

Using a Crooked Dice Department X Commando figure (you'll hear a lot about these figures in this post), I made a Natasha Marcova just with a headswap from Crooked's 'female minions with berets'. Renamed 'Gustava Heffner' in later versions, Natasha/Gustava was a member of the Czech STB who infiltrated Zanzibar Land's army when she and Dr. Kio Marv were captured, setting in motion the plot of the game. She needed to look the same as the Zanzibar Land guards as below, as she stole one of their uniforms and was walking around as an enemy a la Meryl Silverburgh in MGS.


Next up is the 2nd boss you fight in the game, Running Man. This was a $3 USD Reaper Bones figure with some trimming done and minor GS work to make the hooded gas mask he wears in the game, as the original sculpt already had a hooded mask thing going for it. A disgraced former Olympian-turned-terrorist/mercenary, you fight him in an armory flooded with nerve gas while he plays keep away from you so the gas can finish you off before you can finish him. You need to set some mines to "catch" him, but I'm concerned that wouldn't be the most entertaining scenario on the table, so I gave the figure a MP5 SMG from RAFM for some direct offensive ability. Very happy with how he turned out, especially for how cheap and easy a figure he was. 


Further into the game, you get ambushed by Red Blaster. A former Spetsnaz explosive expert with a special operations degree, he rather creepily crawls onto the screen after you exit an elevator, trip wires all over the place to restrict your movement. He lobs grenades at you from cover, and the way to beat him is to throw grenades back. This was another Crooked Dice Department X commando figure, with a large hood trimmed off the shoulders and a smaller collar from GS in it's place. I rolled 5 little GS balls and glued them to his belt to represent Red Blaster's love for grenades. Going to try and paint the white and blue striped undershirt (telnyashka) of the Russian airborne and naval infantry troops, cause you know, Russia. Another departure from the game, I gave the figure a SPAS-12 shotgun from RAFM, just in case the grenades failed to do the trick.


Even later in the game, you fight Predator, who got renamed to 'Jungle Evil' in later versions, which sounds lame. Former South African special forces-turned-mercenary, he was called the "master of the jungle ambush." In game, he looks like he's got a big LMG for a weapon, so I used another Crooked Dice figure which happens to be carrying a LMG! Head swap for a New Order head from Mad Robot mainly to match the big, thermal goggle look of the character. Looking at his sprite, he seems to be wearing a gas mask even though you fight him in an open field, so I'm not sure why that is even as I copied the look. A backpack from Mad Robot and some GS ghillie-type netting draped over his shoulders and I'm calling him done. 

Lastly, the man himself: Big Boss! Simplest conversion here, this is a Hasslefree figure with a GS eyepatch and a weapon swap from a dinky handgun to a more respectable MAC-11. The pose of the figure limits what I can do for weapons, as Big Boss comes after you with a big honking gun in the game that I just couldn't fit with this figure's pose. 

For grunts, I'm again using Crooked Dice Dept X commandos with X insignia filed off for the basic Zanzibar Land guards, the brown-and-orange camo, red beret-wearing mooks who make up the vast majority of in-game opposition. The game manual states that the Steyr AUG and the Enfield L85 were the standard weapons, but as Zanzibar Land's army was mercenary, I think popular guns like the MP5 and the FAL would be well-represented, too. Like Snake, these just have some colors blocked in for proof-of-concept purposes (they don't even have their signature red berets yet!), and need a lot more work for washing and highlights. I have at least a few more ZL guards planned, including a green beret to be followed, maybe as a squad lead or miniboss-type of profile.

I'm still on the lookout for good figures for Black Color, Ultrabox, Night Fright, and Gray Fox, after which I'll have all of Zanzibar Land's elite mercenaries on the table. I'm thinking maybe a ninja from Infinity for Black Color, who was a member of -get this- NASA's extraterrestrial special forces unit! How cool is that?! Even cooler, the game manual hints that Black Color wasn't the only member of this unit running around ZL, just that Kyle Schneider was the one you encounter in the game. 

These are the sprite sheets I've been using as reference...


Thanks for looking!